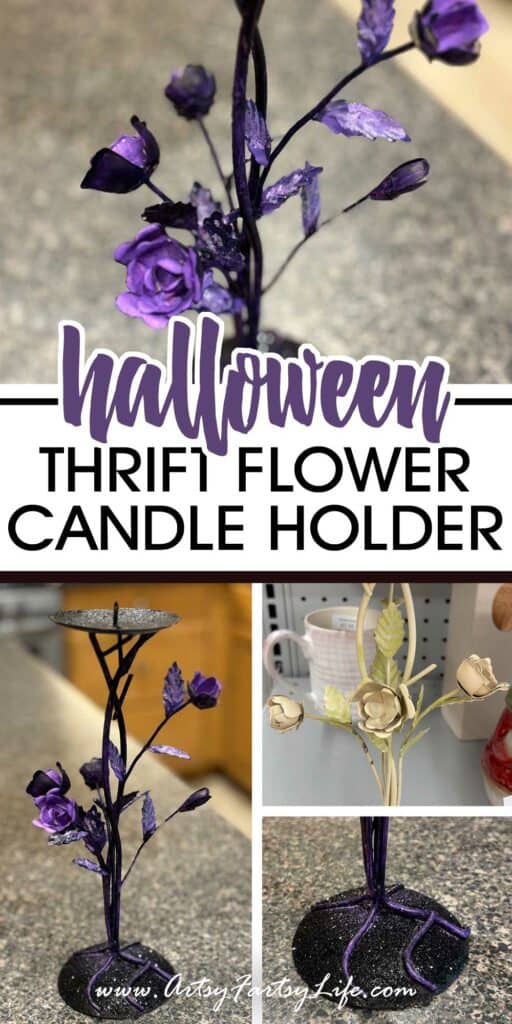
Gather round, my fellow DIY witches and warlocks, because today, we’re transforming a thrift store candle holder from outdated to absolutely wicked! With a little black magic (aka paint, embossing powder, and glitter), we’re turning this vintage metal floral piece into a gothic Halloween masterpiece. Let’s get crafting!

Please note: This article contains affiliate links, and that means that I may earn a commission if you buy something. Read my full disclosure here.
Thrift Store Flower Candle Holder Walkthrough Video
PRODUCTS USED IN THIS VIDEO
- Collage medium (dries fast)
- Super Fine Black Embossing
- Embossing tray
- Dina Wakely Media Glue
- Heat tool
- Windsor and Newton Black Paint
- Lindys Black Embossing Powder
- Tim Holtz Paint (Villanous Potion)
- Violet Mixed Media Embossing Powder
How To Upcycle A Vintage Candle Holder
I TOTALLY love how this project turned out (even though there were some twists and turns along the way!)
Step 1: The Potion (a.k.a. Paint Prep!)
Before we start, take a moment to admire the “before” version—aka the sad, beige candle holder that looked like it belonged in Grandma’s guest room. We’re about to change all that!
Grab some black acrylic paint (or your favorite dark, mysterious shade), and give this baby a solid base coat. I used Windsor & Newton Galleria Black, but any high-quality acrylic will do. Just make sure to let it dry before moving on—patience, young sorcerer!

Step 2: Emboss Like a Boss
Now, here’s where the magic really happens! Instead of just painting over everything, I wanted to give this piece a rich, enamel-like finish. Enter embossing powder.
- First, brush on a strong adhesive (I tried Dina Wakley’s Media Glue, which stays wet long enough to work with).
- Next, sprinkle on fine black embossing powder and tap off the excess.
- Hit it with a heat gun until you see that gorgeous, glossy, slightly textured finish.
- Repeat if needed for a smooth, luxe effect.
PRO TIP: If your embossing powder isn’t sticking, try a second coat or switch up your adhesive. Glycerin-based mediums don’t always hold up over time.

Step 3: A Wickedly Elegant Color Scheme
Halloween is all about the drama, darling. So, let’s bring in some spooky hues!
- Flowers: Deep, dark purples—Villainous Potion and Wilted Violet were my MVPs here.
- Leaves & Stems: A mix of black and deep purple for that haunted garden vibe.
- Extra Sparkle: Because Halloween decor should have just a hint of glam, I added Lindy’s embossing powder in a shimmering purple to the leaves.

Step 4: The Grand Finale—Glitter & Glam!
For the base, I mixed black paint with a fine layer of holographic glitter. This gave it that eerie, midnight sparkle without being too over-the-top (because let’s be honest, Halloween is extra enough already).
If you’re feeling bold, add some green highlights for a “poisoned garden” effect!

Step 5: Bask in Your Gothic Glory!
Once everything is dry and dazzling, place a candle on top and admire your work! Whether you use a deep orange candle for a classic Halloween vibe or a black one for full gothic drama, this candle holder is officially ready to spookify your decor.

And there you have it—what was once a forgotten relic is now a Halloween showstopper! So tell me, did I just create a haunted treasure, or did I ruin an antique? (I vote haunted treasure, obviously.)
Happy crafting, and remember: a little glitter and black paint can fix just about anything. 🎃🖤
Let me know—would you try this Halloween makeover, or do you prefer a different spooky craft?
Here are some more Halloween Crafts you might love:
- How To Make A JACK Spooky Sign – Halloween DIY Crafts
- Free Printable Vintage Halloween Junk Journal Kit
- How To Make Painted Black, White and Gold Halloween Pumpkins